This map was designed to be printed on six feet of thermal receipt paper. Why on earth would anyone do that, you ask? After making a ribbon map of the Suwannee River, multiple people (jokingly?) suggested that I look into receipt printers when I explained how I needed to print the Suwannee map out in four sections. And the more I thought about it, the more that the idea of working within such absurd limitations sounded fun. So I created this map, and I’ll touch on all the things you might want to consider if you, too, want to print a map on thermal receipt printer. If you’re on mobile and want to skip to the full map, tap here.
First, there are some shared challenges here with the previous ribbon map. But the short (6ft) version of it, is that unless you find a river that is unnaturally straight, (or you’re mapping something else, like a stretch of unwavering interstate or a specific line of longitude) you’re going to have to commit a bit of cartographic forgery and straighten out your features. I spent quite a bit of time searching for something that might help me automate this process, but couldn’t find anything freely available that did exactly what I wanted, and I wasn’t sure I could figure it out myself (a thread for another day). So I ended up doing things manually by bringing my GIS data into Adobe Illustrator.
I won’t go into the nitty-gritty of Adobe Illustrator here, but you’ll be using the Scissors, Rotate, and Direct Selection tools often as you manipulate your data. The general trick for straightening things out, however, is to figure out some breakpoints in the river, around which you’ll place a cut separating everything above and below. You can then rotate both the river and everything else beneath that cut (points of interest, roads, etc.) until it’s in line with the above section (with the Rotate tool, you can change the pivot point for an entire selection of objects by holding the Alt/Option key and clicking in the document where you want to place it. This way, you can move the pivot point to the exact spot where you cut the river apart). Then you move down to the next breakpoint, and repeat. In the end your river will have been straightened out on the grand scale while maintaining all the little bends and curves that make it recognizable at the local scale.
It’s best to hide these breakpoints within existing curves—making the river turn a little bit more or a little bit less than it does in reality. You can also hide them in places like bridge crossings, or confluences with other rivers. I’ve noticed that people seem to have hard time pinpointing the breaks when using this method. They see a curve where a curve should be, and so long as it wasn’t outrageously over-adjusted, it still looks correct to them, even to people who know the river well. This map only required four breakpoints, while the Suwannee map was about a dozen. Depending on the length and squiggly-factor of your river, you might need more or less breaks. Occasionally, you’ll also have to fudge with the other features of you map, too. Sometimes you have to add a gentle bend in a road where there is none, or add a kink to a park boundary that isn’t really there. Nobody is using this for surveying, and so long as it looks true at a glance, it’s true enough. You can minimize the amount of work you need to do on these other features by keeping your breakpoints in areas that don’t have a lot of other features around them (for example, one of the breakpoints in this map is at the unnamed stream confluence just south of Mysterious Water Spring, where there isn’t much else going on). Sometimes, it is unavoidable though. I needed a break at the confluence of the St Marks River, and that required a bit of work to reshape the features around it.
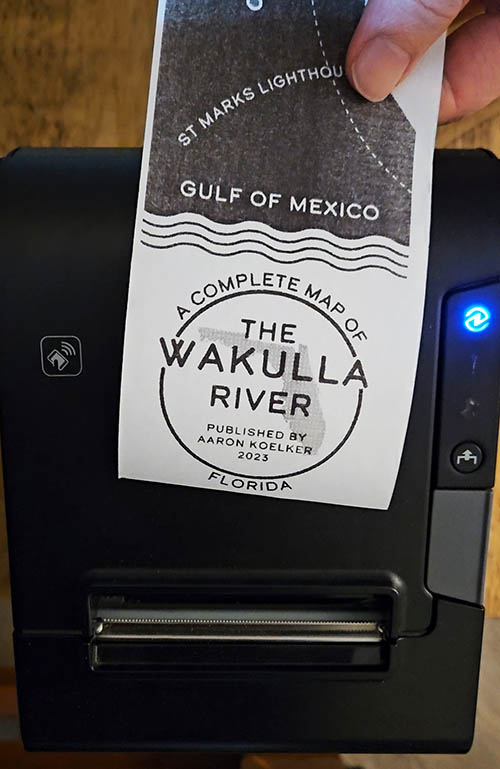
That about covers it for the shared challenges from the Suwannee map, so let’s look at what’s unique to a thermal receipt printer. What is a thermal receipt printer, you ask? If you’ve ever left a grocery receipt in your car for too long, you might’ve noticed it fade or even loses its “ink” entirely. That’s because thermal receipt paper has a special chemical coating on it, which darkens when heat is applied, but can also fade away again when there’s too much heat over a long period. So the printer is actually entirely inkless, which is very cool. It can also be printed very fast—up to 350 mm per second (13.8 in) on the one I used. Just blasting maps into the world!

The downside is that, unlike the traditional ink printer I used for the Suwannee River map, most thermal receipt printers have a fairly low print resolution (mine was 180 dpi), and of course, a lack of color. Worse, they can’t even do true grayscale. The coating either turns black, or stays transparent, so all the shades of gray it tries to print in between are mimicked using different dot and hatching patterns. Some of these patterns are pretty intricate if you look up close, but ultimately it means you can’t get too detailed with your design. The edges between different shades that are too close to one another end up looking fuzzy and unclear because of the patterning, so not only are you limited to grayscale, but high-contrast grayscale.
It is also important to note that these printers can overheat. The first draft I printed got so hot that a weird, dark gradient bled down into the white title section at the bottom of the map. This was caused by the radiant heat coming off of the printhead as it struggled to print the large solid black area near the river mouth. The printer will stop running entirely if it reaches a certain threshold, and while it does resume once it’s cooled down—I found this leaves a small gap in the print. You can avoid all this by setting the printer to its slowest speed, and putting the darkness setting as low (or light) as it will go. (You can then increase the darkness from there until you find a happy compromise between deep blacks and no bleed).
Getting the printer to work with a Windows PC wasn’t too difficult, but may vary depending on the printer model/brand you have. With the Epson TM-T88VI that I found used on eBay, I needed to download two separate programs from Epson’s website to access all the settings I would eventually need to adjust. Otherwise, you can simple plug it into your PC with a USB (assuming your printer has USB output) and Windows will recognize it as any ol’ printer device. From what I understand, there are POS (Point of Sale) programs that directly interact with these printers differently than Windows does, but for map printing purposes, you can technically print anything you could print from Windows to it as if it were a normal printer. It will take images and, regardless of color or resolution, do its best to convert them to grayscale using the different dot and hatching patterns mentioned above.
The last challenge was setting the paper size. Most receipt printer paper that comes on a roll is either 58mm or 80mm wide. The tricky thing is that the printer can’t actually print to the full width of the paper, and the actual maximum print width is disguised within the documentation and difficult to locate. Ultimately, I found what I needed on a forum for receipt-printer enthusiasts (who knew?), and learned that my 80mm paper could only support a print of 72.2mm in width (officially 72mm, but with some tolerance, apparently). I also could’ve just taken a ruler and measured the solid black portion of the map toward the bottom to find this measurement myself, but I was also having centering issues at the time and thought there might be an alignment issue cutting off the print. The other side to this challenge was the maximum print length. Supposedly, the printer itself has no limit on length (other than the full length of the roll itself), but when I did an initial test print using the 12-foot Suwannee River map, it would only print up to 11.5 feet. What I later learned (again, on another web forum I’ve now lost) is that this limit is apparently enforced by Windows, not the receipt printer itself. Maybe you could avoid this by using Linux or MacOS, but then you also have to hope that the printer software can run on there, too.
In order to print this six foot long and 72.2 mm wide map, I had to add a custom paper size into Windows. But I couldn’t just add a custom paper size the usual way via Windows’ built-in, universal printer settings. Instead, I had to do it within the Epson software, which is the point where I realized I actually needed those two separate programs from Epson (both the Advanced Printer Driver and Utility apps for the TM-T88VI). From the latter, you can add a custom page size (72.2mm wide by 6ft tall, in my case), which will then show up as an option in Windows while printing from any app that supports printing. The other program lets you change the darkness, speed, and all sorts of other things.
So that’s a general overview of how this map was made. If you’ve come this far, I hope you’ve enjoyed the addition of this incredibly impractical and unnecessary information to your brain. I do have a couple more ideas I’d like to try with thermal receipt printers …eventually. But for now, on to some other things.
A digital copy of this map can now be found in the map collection at the Norman B. Leventhal Map & Education Center of the Boston Public Library.
